
One of the more tedious jobs in clock repair is counting the number of teeth on the wheels in order to calculate the correct running rate for a movement. If you have a lathe, MicroSet can make this job much easier. The picture below shows a setup that can be used on a Sherline lathe. If you don’t have a Sherline lathe you can adapt this concept to whatever lathe you have.
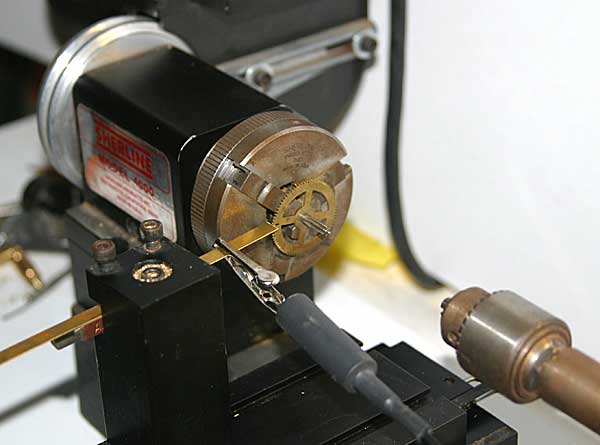
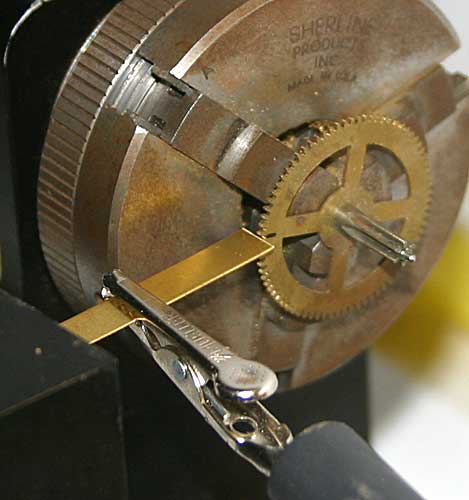
The wheel to be counted is placed in the lathe chuck. Acquire a strip of thin brass from a hardware store that’s about 1/4″ wide and thin enough to flex very easily. I used .016″ thickness. Mount the brass strip on top of the lathe cutting tool so it extends about two inches. Reverse the cutting tool and pull it back so it doesn’t protrude from the front of the tool holder. Advance the tool holder until the brass strip reaches into the valley betweeen two teeth.
Clip the MicroSet acoustic sensor onto the brass strip in front of the tool holder. Arrange the sensor and cable so they won’t move around as you work. Such movement may introduce errors in the count.
Put a mark on the wheel so you can identify the starting and ending position. Turn the lathe headstock slowly by hand in a clockwise direction. The brass strip will rise up and click over each tooth tip. The acoustic sensor will hear this click. Put MicroSet into the Count Mode, and it will count each tooth as you rotate the wheel. Watch your mark, and when you get back to the starting point, MicroSet will tell you how many teeth are on the wheel.
If you have the Rate Finder option for your MicroSet, it will be even easier to count teeth. Fasten a magnet to some part of the headstock that rotates. Mount the magnetic sensor so it will trigger each time the magnet goes around. Now you can use the Rate Finder mode to count teeth and you don’t have to watch for a mark on the wheel — the magnetic sensor does that for you.
The Rate Finder displays results as “Beats Per Hour”. In this case, the value will be the number of teeth on the wheel. The Rate Finder also shows you how many measurements have been taken. For example, it might say:
4: 72.00 BPH
This would mean that you’ve rotated the wheel four times and, on average, 72 teeth were counted on each rotation. Keep an eye on the display as you turn the headstock. If MicroSet shows you the same value for each rotation, you can have confidence that the value is correct. If you get a value that changes, or if you get a fraction (like 72.25) you know that a miscount has occurred in one of the rotations.
Here are a few more considerations to get things to work properly.
- Set the Level Control of MicroSet as low as possible to make the LED blink reliably on each click. If the Level is too high you may get two counts from one click.
- As you rotate the wheel you will see the LED on MicroSet blink with each click. Turn the headstock slowly enough so the LED goes off between each click. If the LED stays on between two teeth, the count will be too small.
- The rate at which you can turn the headstock will depend on the setting of the Blanking Window in your timer. If the Blanking Window is too large, you’ll have to turn the headstock very slowly. If the Blanking Window is too small, you may count two clicks for one tooth. In my use, I have found a Blanking Window of “4” is as low as I can go. To change your Blanking Window, find the section that describes it in the Table of Contents of your MicroSet instructions.
- Turn the headstock with a steady forward motion. Try not to back up or you might generate an extra count. Watch the LED on MicroSet to see that it blinks once for each tooth. In this way you’ll develop a feel for the technique.
- With this method you’ll be able to count a wheel in just a few seconds. Count the wheel two or three times to be sure you get the same answer each time. It’s easy to do, and this will confirm your value.